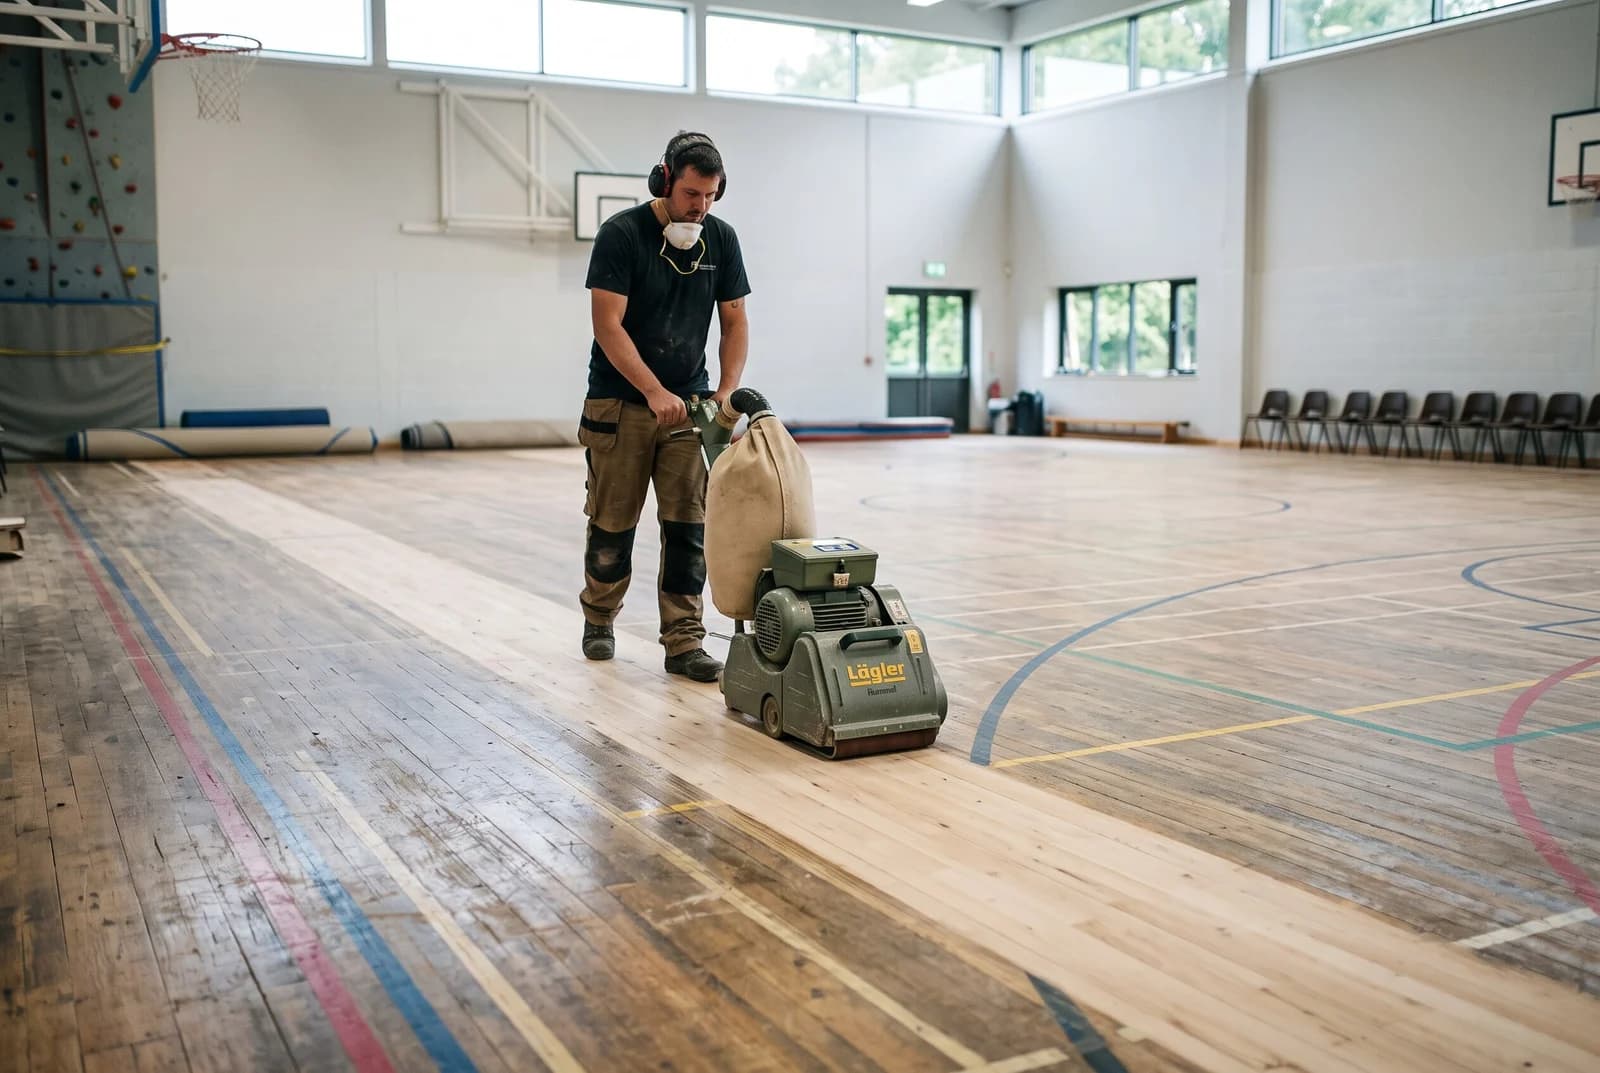
Understanding when a sports hall floor needs refurbishment
A sports hall floor usually gives you several warnings before it needs major attention. The finish may look tired, movement may feel less consistent, or cleaning may no longer restore the surface. Sanding and sealing removes the worn finish and prepares the timber for a fresh protective system, but it should be undertaken because the floor needs it, not simply because a calendar date has arrived.
Signs of wear, damage and declining performance
Start with a visual inspection in good, even light. Look for scratches, dents, dull patches, worn lines, splintering, open joints and areas where the finish has thinned through repeated activity. Changes in appearance matter, but a floor can look acceptable while still developing performance problems beneath the surface.
Walk the hall slowly and note any boards that feel loose, uneven or noisy. Pay particular attention to heavily used entrances, basketball key areas, goal mouths and zones where equipment is regularly moved. If damage is localised, early repair may prevent it spreading; if wear is widespread, a full refurbishment is more likely to be appropriate.
A useful starting point is this sports floor wear guide, which places scratches, dullness and changing slip resistance within the wider sanding and sealing process. Your own inspection should still be specific to the floor, its construction and the way your facility is used.
How traffic levels and sports affect floor condition
Every booking leaves a slightly different pattern of wear. Daily school use, club training, competitions and community bookings can combine to create much heavier traffic than the original floor-care plan anticipated. Grit carried in through entrances acts as an abrasive, while dragged benches, portable goals and bleacher systems can mark the finish or timber.
Different sports also load the surface in different ways. Rapid changes of direction test grip, repeated jumping tests the floor’s resilience, and wheeled or metal equipment can cause concentrated damage. Keep a simple record of bookings, cleaning issues and repairs so that the refurbishment plan reflects actual use rather than assumptions.
Assessing slip resistance, grip and shock absorption
A sports floor must feel predictable underfoot. Excessive slipperiness can make changes of direction unsafe, while a surface that grips inconsistently can affect confidence and movement. Shock absorption is also part of the playing experience, so any assessment should consider the floor system as a whole rather than judging the coating alone.
Ask users and coaches whether they notice differences between areas, especially where several sports share one court. A professional survey can establish a baseline and identify whether the concern relates to the finish, the timber, the subfloor or another part of the construction. This is also the point to consider the relevant performance requirements, including EN 14904 where applicable.
Sanding and sealing compared with cleaning or recoating
Routine cleaning removes surface dirt; it cannot remove deep scratches, worn finish or damaged timber. A compatible recoat may be suitable when the existing surface is sound and only needs renewed protection, but sanding becomes necessary when the finish is failing or the timber needs levelling and preparation.
You should avoid sanding merely to improve appearance. Timber has a finite service life, and unnecessary removal of material reduces the number of future refurbishments available. A clear survey helps you choose between cleaning, recoating, local repair and a complete sanding and sealing programme.
Planning a safe and effective refurbishment
Good planning protects the floor, the building and the people who use both. Before you book contractors, agree the scope of work, access route, storage arrangements, working hours and handover conditions. You also need a realistic allowance for preparation, repairs, coats and curing, rather than planning around sanding alone.

Surveying the floor and identifying problem areas
A survey should map the floor’s condition and record details that affect the method. Check the timber type, board direction, previous finishes, moisture conditions, movement, damaged areas and existing markings. Photographing problem zones gives you a useful reference when reviewing the quotation and checking the completed work.
Ask for an itemised scope that separates preparation, board repairs, sanding, line marking, sealing and testing. Complete Sports Flooring describes a free on-site survey and itemised quotations for facilities in Newham, which can be useful if your venue is arranging a local project. The principle applies anywhere: the clearer the survey, the fewer surprises you face during the closure.
Choosing suitable dates around fixtures and daily use
Choose a period when the hall can remain empty from the first preparation day until the finish has cured. School holidays are often practical, although leisure centres and clubs may need to use quieter booking periods or phase access around other facilities. Include time for unexpected repairs and do not promise a reopening date before the contractor confirms the curing requirements.
Share the programme with reception staff, coaches, cleaning teams and anyone responsible for equipment. A short closure that is well communicated is easier to manage than repeated cancellations caused by dust, wet finish or restricted access.
Protecting walls, equipment and adjacent surfaces
Remove portable equipment wherever possible and protect anything that cannot be moved. Doorways, skirting, wall padding, storage systems and adjacent floors need particular care because sanding dust can travel beyond the court. Establish a clean route for workers and a separate route for staff if both must remain in use.
Confirm who is responsible for disconnecting equipment, moving goals and reinstating fixtures. This avoids rushed movement across a newly finished surface and gives you a proper handover checklist once the work is complete.
Meeting ventilation, access and health and safety requirements
Agree how the hall will be ventilated without allowing outside dirt or moisture to compromise the finish. Check electrical supplies, lighting, emergency exits, fire routes and contractor access before work starts. Where an older building may contain hazardous materials, obtain suitable building information and arrange specialist advice before disturbing any suspect material.
Keep the working area closed to pupils, players, visitors and unauthorised staff. Dust control, personal protective equipment, safe cable routing and clear warning arrangements should be part of the method statement, not improvised on the first morning.
Preparing the sports hall before sanding
Preparation determines how cleanly the refurbishment proceeds. The floor needs to be empty, stable and free from products that could clog abrasives or interfere with adhesion. Taking time here also exposes repairs that might otherwise be hidden beneath the old finish.
Clearing the hall and securing loose fixtures
Remove benches, mats, goals, nets, seating and freestanding storage from the hall. Check fixed sockets, floor boxes and access panels, and secure anything that could vibrate or catch equipment. Mark items that must be returned to their original position so the handover is orderly.
Inspect doors and thresholds as well. A loose threshold can damage sanding equipment or create a trip hazard once the finished floor is reopened. Keep the hall completely clear until the final inspection has been completed.
Cleaning away dirt, wax and previous maintenance products
Vacuum loose grit, then clean according to the existing finish and the contractor’s instructions. Wax, detergent residue and incompatible maintenance products can affect sanding and later coating adhesion. Do not saturate timber, particularly where moisture testing or repair work is still required.
Cleaning is not a substitute for sanding, but it gives you a truer view of the floor and prevents avoidable contamination. Any spill or residue that remains after cleaning should be recorded and treated as part of the preparation plan.
Removing or protecting line markings where necessary
Decide early whether court markings will be retained, refreshed or changed. Existing lines may be sanded through if the whole floor is being taken back, whereas carefully protected markings may be retained during a lighter treatment. The decision depends on their condition, the new layout and the specified coating system.
For multi-sport halls, refurbishment can be a sensible time to rationalise overlapping lines and confirm colours before work begins. Provide an approved drawing rather than relying on verbal instructions once the hall is empty.
Repairing loose boards, gaps and damaged sections
Sanding will not correct a loose board or a structural problem below the timber. Lift or secure defective boards as appropriate, assess open joints and investigate areas that move or sound hollow. Severe damage should be addressed before the final sanding passes so the repaired area can blend with the surrounding floor.
Discuss the repair threshold in advance. Minor defects may be filled, while warped, split or extensively damaged boards may need replacement. This distinction keeps the quotation honest and prevents cosmetic work from concealing a larger fault.
Sanding the sports hall floor step by step
Sanding is a controlled sequence rather than one aggressive pass. The aim is to remove the old finish and flatten small imperfections while taking away as little sound timber as possible. Consistent machine handling, suitable abrasives and careful inspection between passes make the difference to the finished surface.

Selecting sanding equipment and abrasive grades
Use equipment suited to the floor construction and the scale of the hall. Large machines cover open areas efficiently, while smaller equipment is needed around edges and obstacles. Abrasive grades should progress from the level needed to remove the old finish to finer grades that leave a smooth, even surface.
The correct sequence depends on the existing coating and the condition of the timber. Starting too coarse can remove more wood than necessary; starting too fine can leave patches of finish behind. A specialist should test a discreet area before committing to the full court.
Sanding evenly along the direction of the timber
Work with the direction of the boards and keep the machine moving at a steady pace. Stopping in one place can create hollows, while uneven pressure leaves visible bands after sealing. Overlapping passes help create a consistent cut, but you should inspect the floor frequently rather than assuming the machine has treated every area equally.
Corners, transitions and repaired sections deserve extra attention. The surface should feel uniform under a hand inspection once it has been vacuumed, with no glossy islands of old finish or obvious ridges between passes.
Treating edges, corners and hard-to-reach areas
An edging machine and suitable hand tools allow you to reach the perimeter without damaging skirting or wall protection. Keep the edge work consistent with the main sanding sequence; a darker strip around the hall usually indicates that the old coating has not been removed evenly.
Take care around sockets, floor boxes, thresholds and fixed sports equipment. These details are slower than the open court, but they are highly visible at handover and can become weak points if left rough or contaminated.
Controlling dust and checking the surface between passes
Use dust-extraction equipment and seal off the work area as far as practical. Dustless sanding reduces contamination, but it does not remove the need for careful vacuuming and inspection. Check the floor after each abrasive grade and before any repair filler or finish is introduced.
A simple quality check includes looking across the floor from a low angle, feeling for ridges and confirming that no old finish remains in traffic lanes. Complete Sports Flooring states that its refurbishment process uses dustless equipment, a capability that directly addresses this stage of the work.
Repairing and preparing the surface for sealing
Once sanding has exposed the timber, the floor’s condition is easier to judge. Repairs should be neat, compatible with the finish and allowed to dry before the final smoothing passes. The objective is not to make every board look identical; it is to create a stable, clean surface that can accept the specified sealer consistently.
Filling joints, holes and minor surface defects
Use a suitable filler for small holes, shallow dents and minor open joints, following the product instructions. Press it firmly into the defect and remove excess material before it hardens. Large or moving gaps should not simply be filled cosmetically, as movement may reopen them and dislodge the finish.
Choose filler colour with the final appearance in mind, but prioritise compatibility and flexibility. After it has cured, sand the repaired areas flush and remove every trace of loose filler dust.
Replacing severely damaged boards
Boards that are split, badly cupped, rotten or too thin for further sanding may need replacement. Replacement timber should be suitable for the existing floor and installed securely, with its movement and level considered alongside neighbouring boards.
The repair should then be brought gradually into the surrounding surface. Rushing this stage can leave a visible patch or a slight ridge that becomes more obvious once the sealer reflects light across the court.
Smoothing the floor after repairs
Carry out the final sanding passes with a fine abrasive appropriate to the chosen finish. Keep the machine moving and blend repaired areas into the wider floor rather than polishing isolated patches. Vacuum thoroughly, including edges and corners, before the inspection.
Do not damp-clean the timber unless the finish system specifically allows it. Residual moisture, dust or cleaning chemicals can compromise the first coat and create avoidable delays.
Inspecting the finished timber before applying the finish
Inspect the entire floor in changing light if possible. Run your hand over repaired areas, check the perimeter and look for scratches, swirl marks, filler residue and remaining coating. This is the last straightforward opportunity to correct preparation faults before they become sealed into the surface.
Record any agreed limitations, such as historic board variation or permanent marks. A clear pre-sealing inspection gives you and the contractor a shared understanding of what is ready for coating.
Sealing the floor for durability and sports performance
The finish must protect the timber without creating an unpredictable playing surface. Selection should take account of traffic, maintenance, appearance, drying conditions and the performance requirements of the hall. Water-based and oil-modified polyurethane systems may behave differently, so follow the chosen manufacturer’s instructions rather than mixing methods from separate products.
Choosing a sealant for high-traffic sports halls
Choose a coating system specified for timber sports flooring and compatible with the prepared surface. Consider how quickly the hall needs to return to service, the ventilation available and the cleaning regime that will follow. The finish should support suitable slip resistance and a consistent feel, not simply provide a glossy appearance.
Ask the contractor to explain the number of coats, expected drying intervals, exclusions during curing and maintenance products required afterwards. Complete Sports Flooring describes water-based finishes as its recommendation for schools where faster cure times are needed; your project still requires a site-specific specification.
Applying the first coat evenly and safely
Apply the first coat to a clean, dust-free floor under controlled conditions. Maintain a wet edge and work methodically so overlaps, lap marks and uneven coverage are minimised. Keep unauthorised people out of the hall and monitor ventilation without introducing dust or sudden environmental changes.
The first coat often reveals preparation issues that were difficult to see on bare timber. Allow it to dry as specified, then inspect before deciding whether any local correction is needed.
Lightly abrading between coats
Once the coat has dried sufficiently, lightly abrade it to provide an even key for the next application. This is not a return to aggressive sanding; it is a controlled de-nibbing and adhesion step. Remove all dust afterwards, paying attention to the perimeter and joints.
If the coating remains soft or tacky, stop and seek advice rather than abrading too soon. A rushed interval can mark the surface and extend the overall programme.
Applying further coats for protection and consistent appearance
Apply subsequent coats according to the specified system and observe the same working pattern each time. Consistent coverage matters more than chasing a high shine, especially where reflections could make lines or defects harder to read during play.
Keep records of products, batch details, application dates and drying conditions. These notes support future maintenance and help explain the care requirements at handover.
Preserving court markings and confirming suitable slip resistance
Line markings should be applied or refreshed only when the underlying finish is ready and the layout has been approved. Masking, colour choice and edge definition need careful control because multiple sports often share the same playing area. Protect the finished lines while later coats are applied.
Before reopening, confirm that the completed surface meets the agreed specification and that its grip is appropriate for the sports played. Where EN 14904 compliance is required, arrange the relevant testing and retain the results with the project records.
Managing curing, handover and long-term maintenance
The project is not finished when the last coat looks dry. Curing, testing and handover determine whether the floor can safely return to demanding daily use. A clear maintenance routine then protects the investment and helps you identify the next intervention before damage becomes disruptive.
Allowing sufficient drying and curing time
Follow the coating manufacturer’s stated drying and curing periods, taking account of temperature, humidity and ventilation. A surface can feel dry while remaining vulnerable to pressure, moisture and heavy equipment. Keep footwear, furniture and sports apparatus out until the contractor has confirmed that access is safe.
Build a cautious buffer into your reopening plan. It is usually less costly to extend a closure slightly than to repair marks caused by early traffic.
Testing the surface before reopening the hall
Walk the floor methodically and check for tackiness, dust inclusions, missed areas, visible ridges and line-marking defects. Refit equipment carefully and inspect thresholds, floor boxes and access points as they are returned to service. If testing or retesting forms part of the specification, keep the results with the completion documents.
Invite the facility manager to attend the handover and record outstanding items in writing. Complete Sports Flooring presents EN 14904 retesting at handover as part of its process on relevant refurbishment projects, which illustrates why verification should be planned rather than treated as an afterthought.
Establishing cleaning and spill-response routines
Use only cleaning products approved for the finish and remove grit regularly. Place suitable entrance matting where it can reduce tracked-in dirt, and deal with spills promptly without flooding the timber. Tell every cleaning operative which machines, pads and chemicals are permitted.
Keep the routine straightforward enough to be followed during busy weeks:
- Vacuum or dust-mop loose grit before it is walked into the finish.
- Remove spills promptly using the approved method.
- Avoid unapproved waxes, detergents and abrasive pads.
- Report new damage, movement or changing grip as soon as it appears.
These small habits reduce avoidable abrasion and give you useful evidence when reviewing the floor’s condition. They also make it easier to distinguish normal wear from a maintenance problem.
Scheduling inspections and future sanding and sealing work
Inspect entrances, court lines, high-use zones and repaired areas at regular intervals. Keep a record of cleaning issues, equipment damage and user feedback, then compare it with the original handover notes. Many timber floors are commonly considered for sanding on a multi-year cycle, but traffic, finish condition and previous work should guide the decision.
Plan the next review before the floor looks seriously worn. A measured programme may allow cleaning improvements, local repairs or recoating to be considered before full sanding is needed, preserving both performance and the remaining life of the timber.
Conclusion
A successful sports hall refurbishment is a sequence of informed decisions: assess the need, plan around use, prepare thoroughly, sand with control, seal to the right specification and allow the finish to cure. When you treat maintenance and handover as part of the same process, you give the floor a better chance of remaining safe, consistent and serviceable through its next busy period.
—Quick answers
Frequently asked questions
There is no universal interval. Heavy traffic, cleaning practices, floor construction, finish condition and the number of previous sanding cycles all affect timing, so inspect the floor and obtain a professional assessment before scheduling work.
The duration depends on the hall’s size, repairs, marking requirements, coating system and curing conditions. Your programme should include preparation, sanding, coating and a suitable buffer before reopening.
Usually, the active work area must be closed and separated from users. Dust, equipment movement, wet coatings and safety controls make partial access impractical unless the project has been specifically designed and risk-assessed in phases.
That depends on the condition of the markings and the refurbishment specification. Full sanding may remove them, while a lighter treatment may allow some markings to remain; agree the layout and treatment before work begins.
Cleaning removes dirt and residues but cannot correct worn finish, deep scratches, dents or uneven timber. If the surface remains dull, slippery, damaged or inconsistent after proper cleaning, arrange an assessment.
Early traffic can mark, dull or contaminate the coating and may leave pressure points from equipment. Keep the hall closed until the contractor confirms that the finish has reached the required stage for footwear and sports use.
Remove grit regularly, deal with spills quickly, use approved cleaning products and avoid abrasive pads or unapproved waxes. Record damage and changing grip so future inspections and maintenance can be planned sensibly.