
Pickleball and badminton court dimensions compared
Pickleball and badminton can appear similar on a floor plan because both use a 44 ft court length and, for doubles badminton, a 20 ft width. That similarity is useful when planning a multi-use sports hall, but it does not make the two layouts interchangeable. The service areas, centre lines, net details and playing clearances still need to be set out for the relevant sport. This comparison gives you a practical starting point for Pickleball vs Badminton: Line Marking Requirements for Multi-Use Sports Halls, rather than a substitute for the current rules of the governing body.
Pickleball court size and key zones
A standard pickleball court is 20 ft wide by 44 ft long, including the boundary lines. The non-volley zone, commonly called the kitchen, extends 7 ft from the net on each side. Service courts sit behind this zone and are divided by a centre line, with the baseline forming the back edge of each service area.
The court is symmetrical about the net, so your setting-out drawing should show the two sidelines, two baselines, the non-volley-zone lines and the centre line in each service court. Where a hall will host several courts, also draw the surrounding run-off rather than treating the painted rectangle as the full space needed for play.
Badminton singles and doubles court dimensions
A doubles badminton court is 20 ft wide and 44 ft long. Singles play uses the same length but a narrower court, usually 17 ft wide, because the inner sidelines become the singles boundaries. The doubles long service line sits closer to the net than the baseline, while singles players use the full length to the baseline.
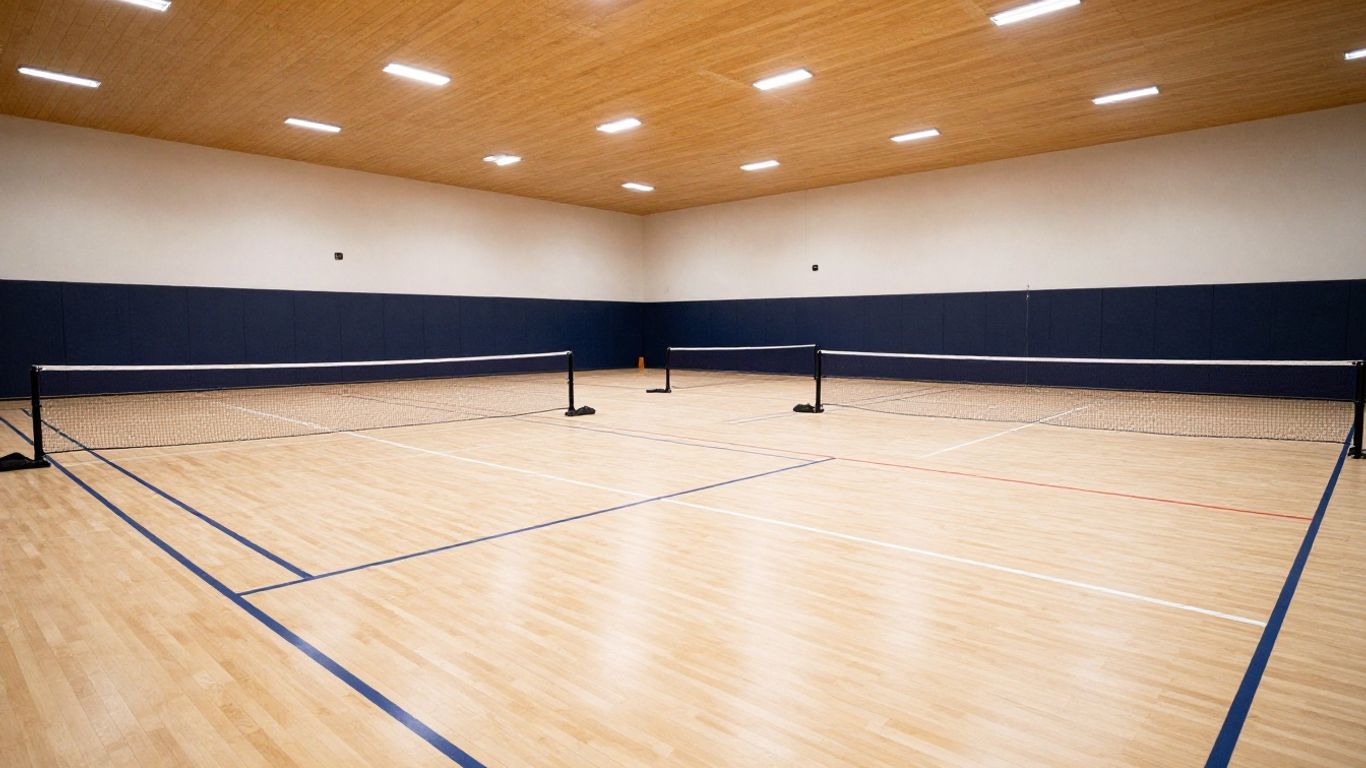
That creates a busy set of lines when badminton shares a floor with pickleball. The badminton short service line, centre line and singles sidelines need to remain distinguishable from the pickleball kitchen and service markings, especially when the surface is viewed under bright overhead lighting.
Net positions, heights and court centre lines
Pickleball and badminton use different net arrangements. A pickleball net is 36 inches high at the sidelines and 34 inches at the centre, whereas a badminton net is 1.524 metres high at the centre and is supported at 1.55 metres at the posts. The net positions may be close in a shared hall, but the equipment, sleeves and height settings are not the same.
You should mark the centre of each court from the measured baselines before positioning posts or sockets. A centre line is useful for checking symmetry, but it is not a licence to assume that a badminton net can be used at pickleball height or that existing floor plates are correctly located.
Line widths, tolerances and measurement points
Court lines are normally measured to their outside edges or centre lines according to the applicable sport specification, so your contractor should state the measurement convention in the setting-out document. Pickleball lines are commonly 2 inches wide, and badminton lines are generally 40 mm wide; always confirm the current governing-body requirement before installation.
Measure from fixed reference points, not from a faded line that may already be inaccurate. Record the finished dimensions, diagonals and key zone distances, since a small error at one baseline can become obvious when several overlapping courts are viewed together.
Planning a shared layout for multi-use sports halls
Good planning starts before paint, tape or adhesive reaches the floor. You need to understand the hall’s structural grid, doors, equipment stores, lighting, columns and available clearance, then test how each sport will be used in practice. A drawing that fits the nominal court dimensions may still be unsuitable if players move into a wall, another court or a circulation route.
The most useful approach is to treat the hall as an operating space rather than a collection of rectangles. Multi-sport court sizes can help you compare footprints, but your own survey must decide whether the proposed arrangement is safe and workable.
Choosing the most efficient court orientation
In many halls, badminton courts are arranged across the width of a larger main court, while pickleball courts may be positioned to use the available length efficiently. The best orientation depends on columns, access doors, spectator areas and the number of courts required at one time, not simply on which arrangement produces the most painted rectangles.
Draw both sports at full scale and test equipment changes between sessions. If you are adapting an existing floor, a line overlay may be more practical than removing a sound surface, but the final choice should follow a site survey and a clear operational brief.
Mapping overlapping boundaries and run-off areas
Start with the playing boundaries, then add the space needed for movement, officials, benches and equipment. Mark overlaps in a separate colour on the drawing so you can see where a line intersection will occur and whether a player’s likely movement path crosses another sport’s boundary.
Complete Sports Flooring describes services including pickleball court installations and overlays, precise line marking and acoustic management for multi-sport halls. That kind of combined brief is useful when your layout involves both a new court arrangement and the practical limitations of an existing sports floor.
Allowing safe clearance between adjacent courts
Clearance should be judged from the likely movement of players, not just from the edge of the painted line. Leave enough separation for players to stop safely, avoid posts and collect equipment without stepping into an active neighbouring court. Where the hall cannot provide generous margins, scheduling fewer simultaneous courts may be safer than compressing the layout.
Use physical walk-throughs with nets in place before approval. Include wall padding, benches, storage trolleys and doors in the test, because each can reduce usable run-off even though it does not appear in the court dimensions.
Checking sightlines, lighting and ceiling height
A line plan can fail when viewed under the hall’s actual lighting. Check glare, shadows, contrast and sightlines from the playing position, and consider whether suspended fittings or a low ceiling affect badminton shuttle flight. You should also check that net posts and overhead equipment do not obstruct staff supervision.
If possible, inspect the floor at different times of day and with the proposed net systems installed. The aim is a layout that remains readable and comfortable during real sessions, including when several courts are occupied at once.
Designing clear and practical line markings
Line marking is a visual design task as well as a technical one. Each sport needs boundaries that players can identify quickly, while the floor still has to look coherent when the hall changes use. A restrained palette, consistent widths and careful intersections usually work better than adding many highly saturated colours.
You should approve a sample area before the whole hall is marked. This lets players and facility staff judge contrast from normal playing distances and exposes clashes that may not be obvious on a contractor’s drawing.
Selecting colours that distinguish each sport
Choose colours with a clear hierarchy: one dominant set for the principal sport and a contrasting but controlled colour for the secondary sport. Avoid colours that disappear against the flooring, reflect strongly under lights or resemble safety markings around doors and equipment areas.
The decision should also consider future repainting. A colour that looks distinctive when new may become difficult to separate from older lines after several seasons, so record the exact product and colour reference in the maintenance file.
Managing intersections between pickleball and badminton lines
Intersections need to be planned rather than painted over casually. Where lines cross, maintain consistent width and edge definition, and ensure that no raised tape edge, thick build-up or uneven coating is left on the playing surface. If one sport is used more frequently, its boundary may deserve the stronger visual priority.
Use a detailed setting-out drawing to identify every crossing before work starts. It is easier to revise a colour or route on paper than to correct a permanent marking after it has cured.
Using contrast against the flooring surface
Contrast depends on the floor’s existing colour, gloss, grain and lighting. A dark line on a dark timber floor may vanish at distance, while a bright line on a reflective surface can become distracting. Test the proposed finish in the actual hall and view it from several playing angles.
Clear visual separation matters because players read boundaries while moving, often in peripheral vision. A line that is technically present but visually weak can still lead to foot faults, confusion and avoidable complaints.
Avoiding visual confusion during play
Keep the number of colours and line styles to the minimum that still distinguishes the sports. Avoid decorative borders that look like additional boundaries, and make sure service lines do not visually merge with the pickleball non-volley-zone lines.
Give players a short familiarisation period after installation. Staff can explain which lines apply to each sport and can report confusing areas before the layout becomes difficult to change.
Selecting materials and installation methods
The marking method should match the floor construction, the hall’s programme and the expected frequency of conversion. Permanent painted systems can provide a clean long-term result, while removable tape may suit occasional events or a layout that is still being tested. Neither option should be selected without checking the manufacturer’s instructions for the existing sports surface.
The finish must remain compatible with the floor’s performance characteristics. A marking product that looks neat but changes traction, creates an edge or reacts with the surface is not a successful installation.

Permanent painted and bonded line systems
Permanent lines are appropriate when the court arrangement is settled and the sports hall will use it regularly. The floor is prepared, measured and masked before the coating or bonded system is applied, with drying and curing times built into the programme.
For an existing floor, check whether recoating, sanding or local repairs are needed first. A permanent line should follow a sound, clean substrate; painting over contamination or damaged finish simply makes later maintenance harder.
Removable tape and temporary court markings
Temporary tape can be useful for trials, tournaments or halls that need to change layouts frequently. It allows you to test an arrangement before committing to permanent markings, but it still needs firm adhesion, clean edges and regular inspection.
Do not assume that removable means risk-free. Lifted edges, residue and poorly stored rolls can create trip hazards or damage the finish, so staff need a defined method for application, removal and replacement.
Compatibility with indoor sports flooring
Indoor sports floors are designed with particular requirements for shock absorption, slip resistance and surface friction. Before choosing a marking material, confirm its compatibility with the floor finish, cleaning regime and any polyurethane or hardwood system already installed.
Junckers is one example of a documented hardwood flooring option described for multi-use facilities, including fixed and portable sports flooring systems for activities such as pickleball and badminton; the suitability of any floor still depends on the project specification and site conditions. You can also review indoor pickleball flooring options when comparing a multi-sport floor with a dedicated surface.
Slip resistance, durability and maintenance requirements
The finished marking should not create a slick patch, a raised lip or a surface texture that catches footwear. Ask for product data and maintenance instructions, then agree how the lines will be cleaned without polishing them into a different level of gloss.
Consider the full life of the hall. Frequent equipment movement, cleaning machines and heavy footfall can wear lines at doorways and service areas first, so those locations should receive particular attention during inspections.
Meeting technical, safety and accessibility requirements
A multi-use hall has to satisfy more than the dimensions of a court. You also need to consider recognised sport specifications, the performance of the sports floor, emergency access, inclusive movement and the behaviour of equipment during changeovers. Compliance should be documented rather than assumed from the appearance of the finished lines.
For UK projects, coordinate the marking brief with the requirements applying to the floor and building. Complete Sports Flooring works with EN14904-compliant indoor sports surfaces and line overlays, but your responsible designer or contractor should confirm the full project specification and any venue-specific requirements.
Applying recognised pickleball and badminton specifications
Use the current rules and technical guidance for each sport when confirming court dimensions, net heights, line widths and service areas. A general web diagram can help you understand the arrangement, but it should not replace the documents used for approval.
Keep a copy of the approved drawing, product information and inspection record. This gives you a defensible reference if a line is questioned or the hall is refurbished later.
Maintaining safe player run-off zones
Run-off areas should remain clear of stored equipment, loose chairs and unprotected posts. You should assess how a player moves beyond the baseline and sideline, including likely recovery steps after a fast shot or a sudden change of direction.
Where space is limited, change the timetable or the number of active courts rather than treating a narrow margin as adequate. Safety depends on the way the hall is operated as much as on the way it is painted.
Preventing trip hazards at line intersections
Inspect every intersection for ridges, bubbles, peeling edges and changes in coating thickness. Tape should be fully bonded, and painted systems should be smooth and properly cured before players return.
Close the hall to play if a defect develops in a high-traffic area. A small repair made promptly is less disruptive than allowing a damaged marking to spread or affect the underlying floor.
Considering inclusive access and spectator movement
Plan routes for wheelchair users, spectators, coaches and maintenance staff as well as players. Keep access routes legible and unobstructed, and avoid using court lines to define informal waiting areas where people may stand during play.
Consider the visual needs of users who may struggle with low contrast or busy backgrounds. Clear colour separation, consistent signage away from the playing surface and good lighting can make the hall easier to navigate without adding more floor markings.
Installing and verifying the court markings
Installation quality depends on preparation and measurement more than speed. A professional-looking line can still be wrong if the reference points shifted, the floor was damp or the masking was applied over dust. Build verification into the programme before the hall is handed back to users.
If the project is in an operating school or leisure centre, plan access around closures, term dates or quieter periods. A short, well-organised shutdown is usually preferable to repeated interruptions during active sessions.
Preparing and measuring the floor before marking
Begin with a survey of the floor condition, moisture and existing markings. Remove dirt and loose material, identify repairs and establish fixed reference points that will remain reliable throughout the work.
Complete Sports Flooring states that its process can include a free on-site survey, moisture testing, an itemised quote and dustless installation for relevant projects. Those checks are valuable because they connect the line-marking decision to the condition of the entire floor rather than treating paint as a standalone job.
Setting out baselines, sidelines and service areas
Set out the main rectangle first, then establish the net line, non-volley zone or badminton service lines from verified measurements. Use a reliable tape or laser system and keep a written record of each dimension as it is transferred to the floor.
Do not rely on visual alignment across a large hall. A line may look straight from one end while gradually drifting away from the intended position, particularly when several courts are laid out side by side.
Checking dimensions, squareness and line alignment
Check both diagonals of each rectangle, compare opposing sides and inspect the relationship between centre lines and net positions. Measure the critical service areas separately; a court can be square overall while still having an incorrectly positioned internal line.
A practical verification schedule should include the following checks:
- Court length and width at the agreed measurement points.
- Diagonals and corner squareness.
- Net line, centre lines and service-zone positions.
- Line width, edge quality and intersection finish.
These records give you more than a visual sign-off. They create a baseline for future maintenance and make it easier to identify whether a later problem is caused by wear, movement or an earlier setting-out error.
Inspecting the finished surface before opening the hall
Walk the entire floor after the marking has cured, using the normal lighting and the equipment that will be used during play. Look for missed edges, paint splashes, tape lift, residue, gloss variation and areas where the lines become difficult to distinguish.
Open the hall only when the surface is safe, clean and ready for the intended sport. Give staff the curing information, cleaning instructions, drawing and inspection record so the handover remains useful after the installation team has left.
Managing multi-use courts over time
A shared court layout changes gradually as lines fade, equipment moves and the timetable evolves. Without a simple management system, staff may repaint from memory or place nets in slightly different positions each week. That creates inconsistent play and can damage an otherwise sound floor.
Treat the marking plan as a living facility document. Review it when equipment, users, lighting or the hall’s programme changes, and keep any contractor information with the floor maintenance records.
Creating a line-marking plan for staff and contractors
Your plan should show every court, colour, line type, net position, reference dimension and restricted area. Add photographs of intersections and floor plates where they will help someone understand the arrangement without measuring the entire hall again.
Include the approved products and application method, but do not assume a future contractor can use any paint or tape. Compatibility and curing requirements should be checked each time work is specified.
Inspecting wear, fading and surface damage
Inspect high-use areas at planned intervals, especially baselines, service zones, doorways and locations where nets or portable equipment are moved. Look for fading, chipped coatings, lifted tape, residue and changes in slip or gloss.
Record defects with a location and photograph. This helps you distinguish normal line wear from a wider flooring issue that may need specialist assessment.
Repainting or replacing temporary markings
Repaint only after confirming that the old marking, substrate and surrounding finish are suitable for the proposed system. For temporary tape, remove failing sections promptly and clean residue according to the floor manufacturer’s instructions.
If the hall’s use has changed, revise the layout rather than simply adding another colour. A controlled replacement programme usually produces a clearer and safer result than accumulating layers of obsolete lines.
Coordinating sports equipment, nets and court changes
Store posts, nets and dividers so they do not scrape the surface or block run-off areas. Train staff to use the same reference points when changing from badminton to pickleball and to check that the selected net height matches the activity.
A written changeover routine can cover equipment inspection, floor clearance, net position, line selection and a final walk-through. Complete Sports Flooring provides sports flooring installation and refurbishment services in London, including line overlays on existing multi-sport floors, so a planned review can identify when professional work is preferable to repeated local repairs.
Conclusion
When you plan pickleball and badminton together, accurate dimensions are only the beginning. A measured layout, clear line hierarchy, compatible materials, safe clearances and recorded verification will help you offer flexible sports-hall use without compromising playability or floor performance.
—Quick answers
Frequently asked questions
They share a 44 ft length, and a doubles badminton court is 20 ft wide, like a pickleball court. Their internal service zones, net requirements and line arrangements are different.
Pickleball lines are commonly 2 inches wide, but you should confirm the current governing-body specification and the agreed measurement convention before installation.
Often, a line overlay can be considered, but the floor condition, available run-off, line intersections and marking-product compatibility should be assessed first.
Usually, yes. Contrasting colours make the sports easier to identify, provided they work against the flooring surface and do not create glare or excessive visual clutter.
Check dimensions, squareness, line widths, intersections, surface smoothness, curing, slip characteristics, net positions and the clearance around each active court.
The required space depends on the applicable sport guidance, hall layout and level of play. Assess movement beyond each boundary and keep walls, equipment and adjacent courts out of likely recovery paths.
Inspect them routinely as part of the facility maintenance programme, with extra attention after heavy use, equipment changes, cleaning work or signs of fading, peeling and surface damage.